2.17 Learning guide - Memories Mem keypad More buttons
Transceiver memories
Transceiver memories usually contain frequency and mode parameters and possibly other parameters.
The memories must be set up on the transceiver. piWebCAT cannot do this.
piWebCAT simply launches a memory by its number.
If there are memory banks (eg: A, B, C) then these must be preselected on the transceiver.
Below is the configuration data in buttonshl and catcodeshl for a button to launch memory 59.


The button must use code=MECH. The Hamlib command is \set_mem VFOA # .
The server substitutes the # with value 59 from the client command message.
You might label the button as mem59 OR 3.72 (ie: the frequency)
You can set up as many MECH buttons as you wish .... but perhaps the memory keypad is more efficient.
MTOV command - important
Some transceivers use a memory channel command that selects the memory and applies it to the VFO
Some transceivers require two commands: Select memory and then Apply to VFO.
Some transceivers have all three commands thus giving both the above options.
Hamlib's \set_mem VFOA 59 selects the memory. This command is configured for MECH as above
It has to be followed by \vfo_op VFOA TO_VFO This applies the selected memory to the VFO.
The \vfo_op command is configured only in catcodedshl. It has code = MTOV (move to VFO)
You could configure a button to make catcodeshl send out \vfo_op VFOA TO_VFO, but you don't need to.
piWebCAT, internally sends a MTOV command to the server 1 second after every MECH command.
If you are not using Hamlib and you don't need MTOV, then simply do not configure it in catcodes.
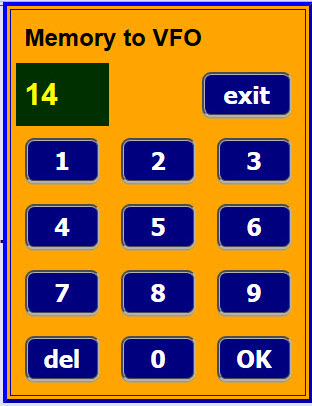
Memory keypad
|
Examine the MPad configuration in buttonshl. It must have code=MPAD and action=S (Single action button) The Mpad button has no action other than to display the keypad. The OK button sends an MECH command to the server |
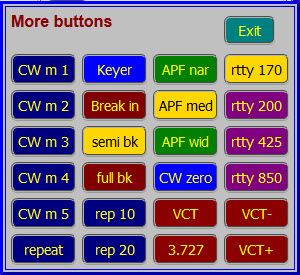
More buttons keypad - example below from my FTdx101D-H configuration
|
This provides 24 buttons in four columns with: It is launched from a button with:
The More button has no action on server / transceiver. Button configuration is the same as the buttons on the main window. |