14.6 Adding Mumble server and client to the micro SD card
Mumble server
RPi terminal:
sudo apt-get install mumble-server --fix-missing
sudo dpkg-reconfigure mumble-server (This can be re-run any time)
A succession of windows appear (navigate with arrow keys then Enter - mouse doesn't work)
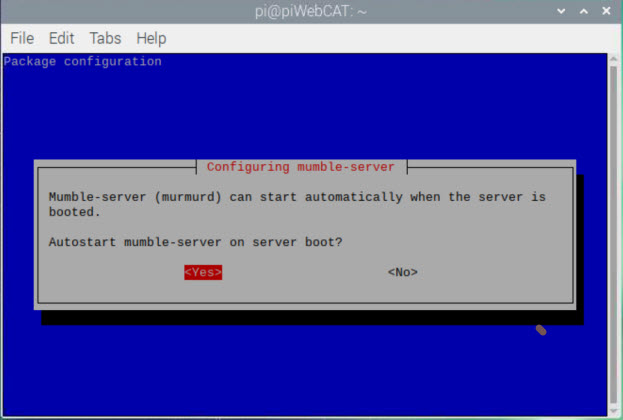
The are three question windows. First one shown
|
Autostart on boot - Yes Higher priority - Yes Password - your choice - I set feline on SD card |
sudo /etc/init.d/mumble-server restart
Mumble client on RPi
sudo apt-get install mumble --fix-missing
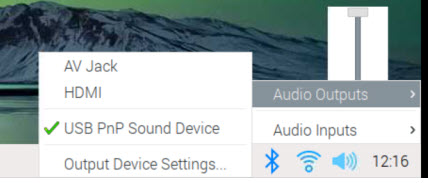
At this point - make sure that the USB audio adapter is plugged in to the RPi.
|
Click the speaker icon taskbar-right - set max volume. Right click the speaker icon: - Select USB PnP Sound Device as output - Select USB PnP Sound Device as input |
Click the raspberry icon task bar left. Scroll up to Internet, across to Mumble - right mouse - add to desktop.
Mumble can now be started with the newly added Mumble desktop icon (or in RPi terminal type: mumble)
Mumble should launch screen top left with a Welcome screen.
(if not Welcome screen then use configure - audio wizard)
Mumble client on RPi continued.....
- click Next
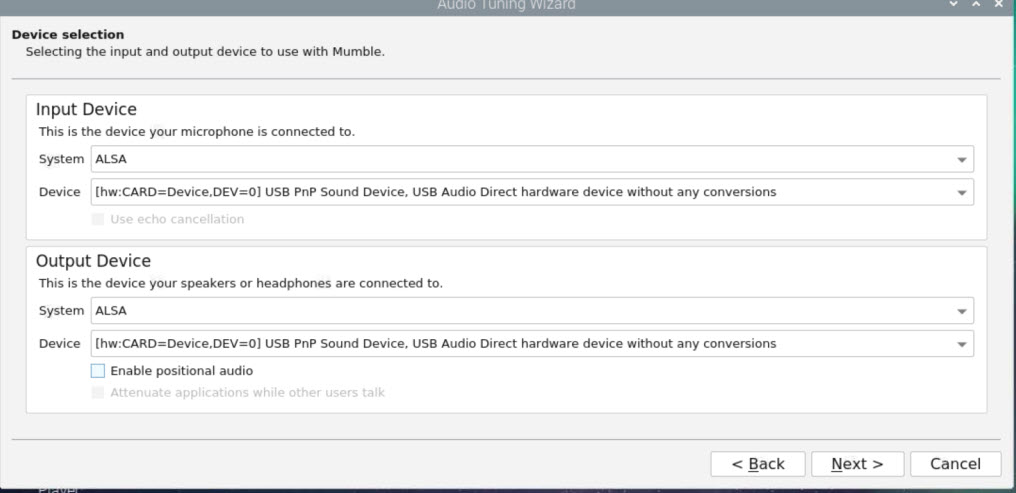
You now make some configuration selections. These can be adjusted later by simply re-running mumble.
An input / output device selector window appears - configure as shown below:
(Make sure to select ..... without any conversions)
- Click Next
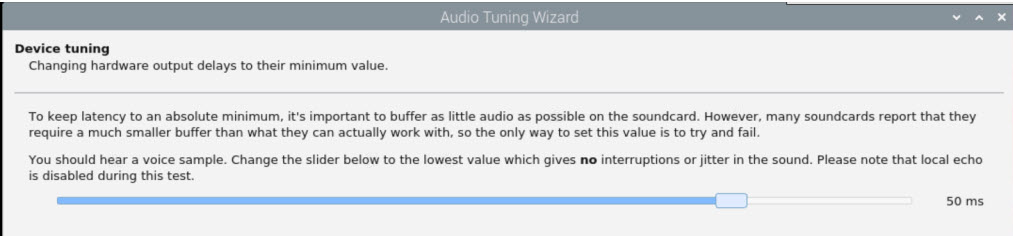
Plug headphones into adapter output.
The Device tuning latency window appears - follow instructions.
( If no voice output, leave at 50ms for now)
Mumble client on RPi continued.....
Click Next:
The Volume tuning window appears as below.
This is a volume setting for transceiver Rx output to the USB sound adapter 'microphone' input.
.. So it has nothing to do with actual microphones!
You need to connect the adapter input to the transceiver Rx AF output.
If this is from a rear panel data connector, then it is likely to be at an AGC determined fixed level for a
medium/strong received signal level. (eg: The FTdx101D has a 300mV output, not controlled by AF gain.)

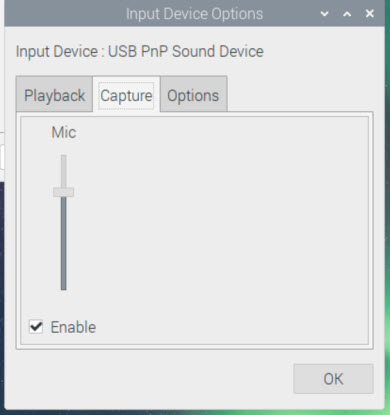
Right click the speaker icon again and then select Audio input and then Input device options as shown below..
Select the Capture tab and make sure Mic input is enabled.
|
The supplied SD card RPi installation doesn't provide this window frrom clicking the speaker icon. I made a complete SD card rebuild for final issue to users in order to have the latest RPi operating system and to avoid any clutter from nine months of development. Itdoesn't seems to matter - Mumble worked fine |
Feed in received audio from the transceiver and adjust the slider in Input Device Options so that the thin marker bar
is at the high end of the green section. (This corresponds to the displayed 'speak loudly' instruction.)
Then reduce the volume to a low level (probably by reducing RF gain) and adjust the slider on the mumble window
for the marker bar to stay in the blue (This corresponds to the 'speak softly' instruction.)
Click Next
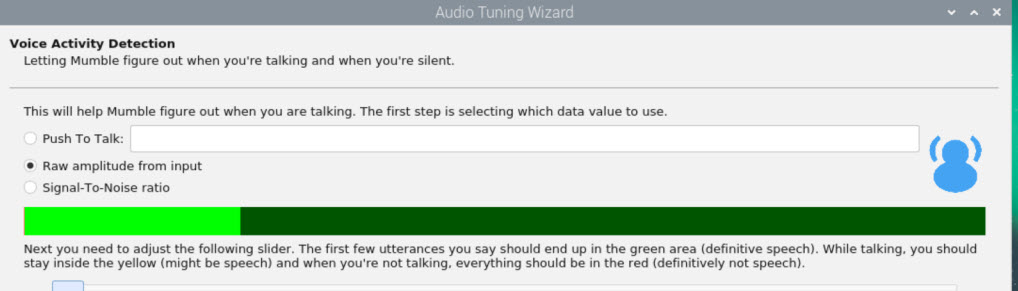
The Voice Activity Detection window appears.
This appears to be a Mumble VOX system. We don't need it. This is received audio!
Select Raw amplitude from input and push the slider fully left so that mumble thinks that a signal is always present.
Mumble client on RPi continued.....
Click Next:
The Quality & Notifications window appears.
Select High quality and Disable Text-to-Speech
Click Next:
A Finished window appears
... You have the option of whether to submit anonymous statistics to the Mumble project.
I disabled this because our reversal of Rx and Tx might produce confused statistics?
Click Finish
Now we have to set up a connection to the mumble-server on this RPi.
With Mumble still running - this is client configuration. We have to connect it to the mumble server on this RPi.
Click menu - Server and then Connect.
Then click Add New...
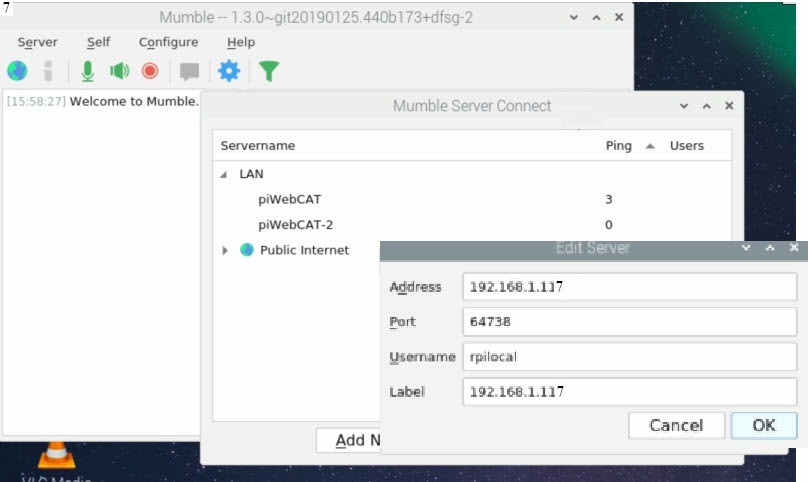
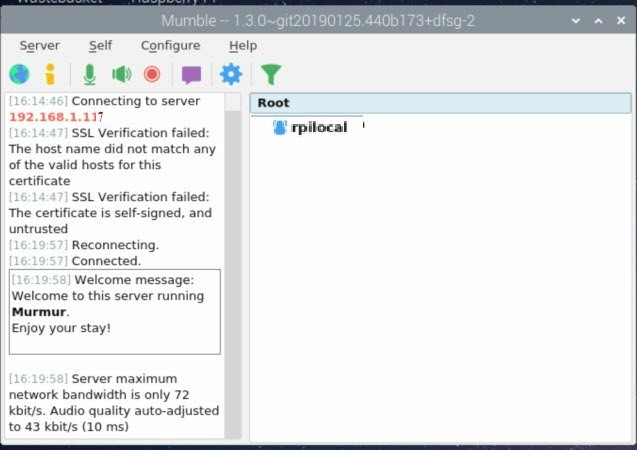
Enter in the Address box the IP address of this RPI, eg: 192.168.1.117 above
Port 64738 should appear by default.
Give the connection a name - eg: I suggest rpilocal here (The supplied micro SD card has rpilocal )
The name of the connection defaults to the IP address (you can change it)
Click Ok:
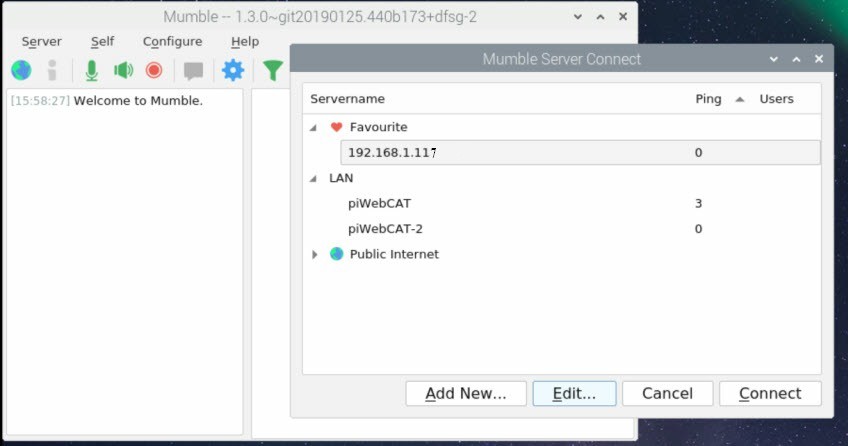
The connection (named 192.168.1.117) appears as a favourite. (The connection can be edited later.)
Mumble client on RPi continued.....
Click Connect:
You are presented with a window that informs you that certificate verification has failed.
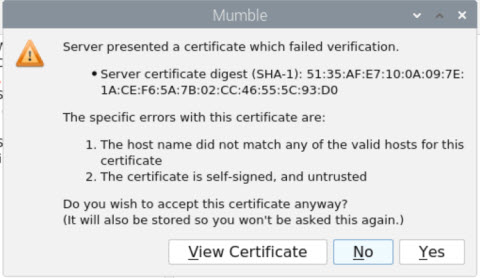
Click Yes to accept the certificate.
You will not then be presented with this failure message when you connect again.
Note that password login is an option - but we don't want this.
We want the complete RPi server and client system to auto start on power up without any user interaction.
Finally - we are connected
Mumble client on RPi continued.....
We now need to ensure that the whole system starts automatically on RPi power up.
The mumble-server is dealt with - It was configured for auto-start on reboot.
For the client:
Click the Configure menu option again and then click the Network button.
Reconnect automatically should already be checked - see below.
Check the Reconnect to last server on Startup box.
Check the Force TCP mode box.
Ensure that Direct connection is selected in the Proxy panel (No proxy server)
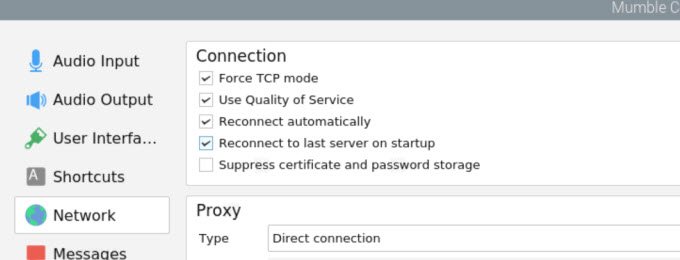
Click Apply and then OK.
Now close Mumble using menu Server ... Quit and then restart it
(Otherwise your configuration will not be saved)
We are now in a position where clicking the mumble icon on the desktop will start mumble
and activate all the audio connections.
Finally we must configure auto start of Mumble on power up / reboot.
Using RPi terminal type:
sudo nano /etc/xdg/autostart/mumblestart.desktop
This opens the nano editor to create a new file. The file is therefore initially empty
Enter the following text into the file:
[Desktop Entry]
Type=Application
Name=Mumble
Comment=Audio VOIP client
NoDisplay=true
Exec=mumble
NotShowIn=GNOME;KDE;XFCE;
Then type the usual Ctrl-X Y and then Enter to save the file.
To test everything:
sudo reboot
The RPi should restart with mumble visible and operational.