2.1 Getting started with piWebCAT support group at piwebcat@goups.io
Note the Learning Guide sections 2.8 - 2.15. These use training configurations on the SD card.
They use the Hamlib database of 250 radios and so are not rig-specific.
They evolve from A to B to C with progressive addition of features.
Two versions are provided: The Transceiver-H-A-NV, ...H-A_NV and ..H-C-NV configurations
do not use Hamlib --vfo mode. This is better for Icom radios. See section 2.10 - Icom issues
Please note that piWebCAT was designed on my four radios, FTdx101D, FT920, F847, IC7000.
Hamlib supports 250 radios and a existing configuration can be made to work with another radio.
This still involves experimenting: Hamlib provides a generic command syntax and uses common
parameter names, eg: ROOFINGFILTER .... but not all rigs have CAT control of roofing filters!
Some features are untested. For example, I haven't run piWebCAT via USB with an Icom transceiver.
(The covid lockdown gave me the time to develop piWebCAT, but prevented me from
visiting other radio hams to test is on their radios!! )
Hardware
piWebCAT was developed on Raspberry Pi 4 computers. I have not tested on RPi 3 computers.
A complete preconfigured system is available from G3VPX on a 16Gbyte Micro SD card.
A fast Class 10 card is recommended. The cost of these is now under £5.
Please see Section 14.2 Support. Supply SD card and PCB
Interface to the transceiver is one of:
- USB - No extra hardware required.
- RS232 - Serial Pi Zero PCB, Serial Pi Plus PCB or a piWebCAT PCB from G3VPX (bare board)
- Icom CI- V - 3.5 mm mono jack - Rx and Tx data share a single wire
- Needs a piWebCAT PCB from G3VPX.
For Rx and Tx audio support via Mumble, a USB audio adapter is needed (£4.50 from Pi HUT)
RPi user interface
piWebCAT and the Mumble audio system run on the RPi without any need for user intervention at start up.
Thus keyboard and mouse are not needed. The RPi, once configured can be treated as a 'black box'.
If keyboard mouse access is needed, then the most convenient approach is to use VNC client on a PC.
The RPi configuration includes VNC server for this purpose.
Running piWebCAT
piWebCAT is run by simply inserting the address (or URL) of the RPi in the URL bar of a web browser.
eg: 192.168.1.117.
(The Apache2 web server provides access on port 80 (ie: 192.168.1.117:80) which is the standard
port for web browsing. Many website then switch to secure (https) access ... which is not needed here)
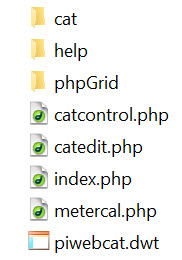
The piWebCAT 'website' on the RPi webserver.
|
The 'website' structure is shown left These files and folders are located in the RPi web root at /var/www/html. The cat folder and the five files are the code that I have generated. The help folder contains a copy of this website and as such is accessible The phpGrid folder contains 21.4 Mbytes of phpCode for which I purchased |
FTP access
The RPi is configured with pure-ftpd.
This is an FTP server that allows access to /var/ww/html (the web root) and to the /home/pi folder.
Files can be uploaded and downloaded to a PC using an FTP client program such as FileZilla.
Access parameters are: IP address, eg: 192.168.1.117 password = feline.
User = upload for web root and piuser for /home/pi.
Modifying piWebCAT code
Microsoft's Expression 4 was used to develop piWebCAT. This is a free web development application.
The development was totally based on writing code and then testing. The visual facilities were not used.
Expression 4's site settings are configured with the same FTP access parameters as listed above.
The website files and folders are downloadable as a zip file (see section 14.1).
They can be unzipped into a folder of your choice on your PC and then that folder is specified as the
web root for Expression 4 development.
MariaDB (MySQL) database.
piWebCATs; configuration data is stored in a MySQL database named: radios.
The data can be edited in two ways:
- Using the table editors of piWebCAT's configuration system.
This is extensively documented in this manual.
Editing is restricted to a selected radio. (eg: The buttons table contains control button data
for all configured radios but you only see the records for the selected radio. .. which is good! - Using an external database editor such as MySQL Front or HeidiSQL (free downloads).
This is discussed below. Editing is of a whole table rather than radio-restricted.
MySQL Front / HeidiSQL ... PC based
You create a login with:
- Host = IP address of RPi, eg: 192.168.1.117
- port = 3306 (This is a standard port for MySQL access)
- user = piwebcat
- password = feline
- database = radios
Below is shown part of my buttons table showing data for the FTdx101D.
MySQL Front and HeidiSQL allow for editing of the database tables and for backup and restore
of tables or the whole database.
The ability to backup the whole database is very important if you are making significant changes.
Using MySQL Front:
Backup: right mouse the radios database label top left and then select Export .... to SQL file.
This will backup the whole database as an SQL file which can be later restored by similar actions.
